Tweaking | Goodiestech Blog -->
Showing posts with label Tweaking. Show all posts

09 June 2017

How To Increase RAM of Android Device [Root & Non – Root]


Many Android users are facing problems while installing or running Apps on their device due to insufficient RAM and Poor Performance.Whenever we open an App that needs more physical memory than available in our phone, device suddenly gets hanging and won’t respond.This is mainly due to lack of RAM(Random Access Memory) in our Android Device.In such situations, we can easily increase our Android Device’s RAM by doing a simple tweak.
Let’s say that you have an Android Device that is really old.Maybe your device’s RAM is somewhere around 256MB to 1GB.
We will be using SD Card/Memory Card for this purpose, so make sure that you have a Memory Card which is of class 4 at least.Class 6 is recommended and Class 10 is great.
Whether your Android device is rooted or not, I will share two unique tricks that will help you to increase your Device’s RAM and get outstanding performance on your device.
Now with that all being set, let’s quickly jump into the tutorial and see How you can do it all yourself.


What you Need:

If you are following Method 1, then your device must be rooted. If your device is not rooted then follow Method 2.
  1. Device must be Rooted – Method 1
  2. Check if your device supports, memory swapping – Just install Memory Info and Swapfile Check and check whether your device is compatible.
  3. Memory Card which is at least class 4 and class 6 – 10 recommended.
So, this is our basic requirements.

How To Increase Ram Using Roehsoft RAM Expander App

Method – 1

  1. Download Roehsoft RAM Expander App
or
2. Launch Roehsoft RAM Expander App and grant Root Permission.(This app only works in Rooted Device, so if your device not rooted then it won’t work and shows error.)
Increase Android Device's RAM
3. Now just click on “Swap Activ” and select your Memory card from the storage list(In most case it will be something like sdcard0). After selecting memory card click on Activ Swap button again.


Read: Top 10 Uses of OTG Cable – Mind Blowing

4. Now follow the On-Screen Instructions and choose at least 512MB swapping memory.This process will take some time, depending on your device configuration.
Android Phone's RAM Increased
5. After creating Swap File click on the Activ Swap button and you are done!
Using this App, you can increase your RAM or Physical Memory up to 4GB. Next onwards when you open any heavy Games or Apps, your phone won’t hang or lag

Increase Android Device’s RAM using Smart RAM Booster – No Root

Smart RAM Booster is simple light weight Android App designed to Increase RAM of any Android Smartphone with a single click.This one is a very simple to use App which does not require any kind of Root Access.
  1. Download Smart RAM Booster app from the Google Play Store:
2. Once Installed, Open the App.
3. Now you can Whitelist specific apps for increased performance.
4. Or, If you want to Boost your device’s whole memory, just click the “Boost Now” Button.
Now your Android Device will be boosted for higher performance by killing unwanted apps.This app comes really handy when you want to increase your Android Device’s RAM without having Root Access in your Device.

Wrapping Up…

That’s it, guys, see how simple it was to Increase RAM of any Android Device.
If your device has insufficient RAM for running any particular app, then you can actually make use of this tweak and run any app on your device.This tutorial will also help to fix your Android Device’s Poor Performance.

25 May 2017

How to Move Chrome Browser Address Bar to the Bottom of Your Screen

One of the greatest attractions of Android is customization – I have used this statement probably thousands of times. But today, (technically) we are not going to customize Android but the Chrome browser for Android. We all know how big a success Chrome browser is. I have been using Chrome since the day Google unveiled it and I absolutely love it. Of course, except when it eats up all the physical memory on my PC; I think we all can agree on that!

One of the many things I love about the Google Chrome Browser is its chrome://flags menu. Unlike the traditional, straightforward menu/options which you find under settings, this one’s hidden. The reason is Google believes that the features under this hidden menu are experimental and may not give expected results all the time. But as far as my experience goes, they are pretty harmless and usually work well.
In this little tutorial, we will see how you can move down the address (and search) bar in Chrome browser on Android devices. If you own a big phone, your hands will thank you for this and you can thank me later! Follow the below steps to move the Chrome Browser address bar to the bottom of your device’s screen.
Some Hidden Chrome Settings on Android You Should Try

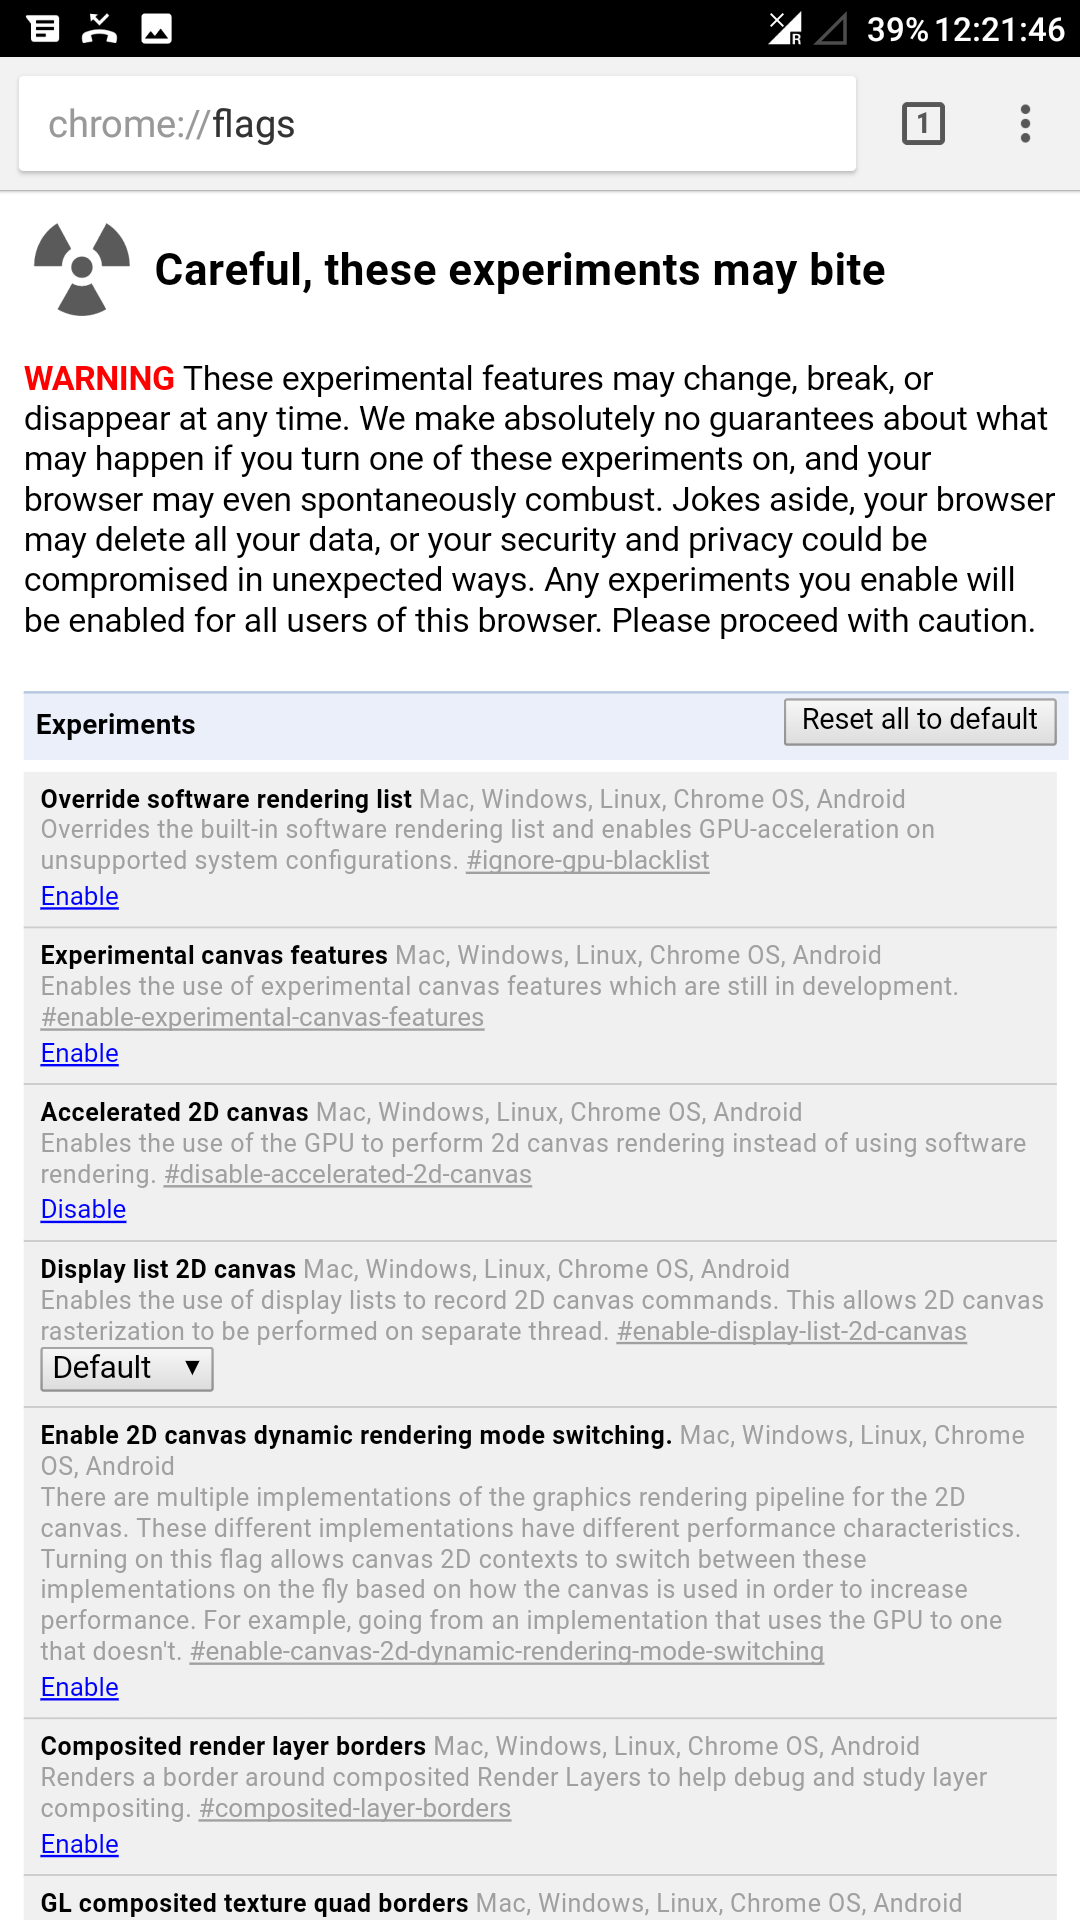
1. Open Chrome and go to the hidden Flags Menu

To go the hidden Chrome Flags Menu, type in ‘chrome://flags’ (without quotes) on your Chrome’s address bar. You will be in the below screen now:


1. Flags Menu

You will be shown a warning that the features available in this section are still experimental and are not meant for prime time use and might cause issues.
Must read: Boost your Chrome browsing experience with Earth View

2. Change the ‘Chrome Home Android’ Setting

There will be hundreds of different options on this screen and we need to find the one named ‘Chrome Home Android’. The hard way is to scroll and look for the option. The easy (and smart) way is to use the Chrome’s built-in page search option.
  1. Tap on the menu icon and select ‘Find in Page‘.
  2. Start typing ‘Chrome Home Android‘. About halfway whilst typing, the setting will be highlighted and displayed for you.
  3. Once you have found the option, select ‘Enabled‘ from the drop-down menu. You will be prompted to relaunch chrome. Do the same for the changes to take effect.

Once the Chrome restarts, you will find the address bar on the bottom of your screen! Refer to the screenshot below:
If you wish to go back to the original setting, simply repeat the above steps and choose ‘Default’ from the drop down.
Related post: Some Tips and Tricks for Chrome Browser on Android
Do you have any favorite Chrome Flag setting? Let us know in the comments below!
Advertisement

How to Increase Audio Quality Of Your Smartphone

Hi! Today in this article we will learn how to install Viper4Android Fx on any Android device. . Now, users have been getting many problems while installing the application on their Android device. Because of the lower Android version.
Dolby atmos need 4.3x or higher version to run on Android device. Eventually, these days I discovered one software from which you can easily install Viper4Android Fx to your Android device. Most of the times peoples love to hear music in high-quality sound. When I tested this Viper4Android on my Samsung Note 7. This application was running virtually excellent and amazing. I love the sound a lot. Because it was something great then Dolby Atmos.

Install Viper4Android on Your Android Device

It’s cool if you’re having the custom recovery installed on your Android device. Otherwise, you can also install viper4android on your Android device without recovery.

For best result, I will advise you to install it through recovery only. Flashing this files are really easy if you installed the custom recovery on your Android device.

Requirements:

How To Install Viper4Android On Your Android Device

Step 1. Firstly complete all the requirements listed above.
Step 2. While Installing Viper4Android you might get the “installation blocked warning” to bypass it simply click on setting and tick unknown sources.
Step 3. Hit back and try installing the application again on your android device.
Step 4. After installing the application Don’t open it just click back and then open BusyBox

Viper4Android killertricks
Viper4Android /.© Killertricks

Step 5. It will take few sec to install all the required binaries on your android device.
Step 6. Now, Open the Viper4Android Fx application on your device and update the drivers.


Viper4Android killertricks
Viper4Android /.© Killertricks

Step 7. After clicking on update drivers it will ask for root permission and Grant it


Viper4Android killertricks
Viper4Android /.© Killertricks

Step 8. After that Reboot your android device and open the application again to successfully install Viper4Android Fx on your android device.


Viper4Android killertricks


Video Tutorial:


This was the article about How To Install Viper4Android Fx On Your Android Device. If you face any difficulty while installing this application please feel free to comment below. Make sure that you installed the BusyBox to run Viper4Android Fx On Your Android Device. Thank you for visiting, for more tips and tricks .Remain blessed.


23 May 2017

How To Install Android O Emoji on Any Android 5.0+ Device

In case you’ve not been keeping up with the latest news in tech, Google recently released the second developer preview of Android O. There are some noticeable changes in this release compared to the last one. Mostly, these are visual changes and one of them happens to be emoji. For years now, the stock Android’s emoji set has retained a blob-like appearance which rather resembles the Android mascot. Android O will, when it officially releases, bring a new set of emoji instead that you’ll actually recognize. The new emoji are the ones used on almost all popular messaging services. If you were not a fan of stock Android’s emoji, you can actually install Android O emoji right now.

That is, if you have an Android device running Android 5.0 Lollipop and above, which also has a custom recovery installed at least or has been rooted with Magisk. Below you can see the difference between the new set of emoji and the old ones that carried on until the first developer preview of Android O.
Downloads


Requirements

Install Android O Emoji on any Android device Even if you have Magisk installed, you can choose the normal flashable zip. But it is recommended that you download the Magisk version since it is a systemless mod. Meaning it won’t trip the safety net and is also slightly safer than the traditional flashable zip. Also, the flashable zip will modify your system’s font so there is a slight risk involved. You might want to create a backup of your system partition first.
  1. To install the new emoji, download one of the zips above.
  2. Boot your device into recovery mode.
  3. In the TWRP menu, select Backup if you’re flashing the normal zip and then select the system partition. Swipe right to initiate the backup process.
  4. Select Install in the TWRP main menu and browse to the downloaded zip file.
  5. Select it and then swipe right to flash the zip. Both the Magisk module zip and the normal flashable zip can be installed like this.
  6. Once the installation is complete, tap Reboot System.

ALSO SEE...How To Enable Android 8.0 Oreo Boot Animation On Any Phone

15 April 2017

Easiest Way ToTweak Imei Of Any Android Device

Today, we will be sharing with you the latest Method on how to tweak or change IMEI any Android 6 devices including some stubborn devices which are hard to tweak.
The steps might be too hard ONLY if you don’t follow the Guidelines accurately but if you do look at them and follow them chronically then the steps will be simple, easy and short.

How to Change the IMEI of Any Android Phone running on Android 6.0 Marshmallow

Before you continue, Note that, you must Root your Android Smartphone 
MUST READ: How To Root Any Android Smartphone.
Then, another important you have to do is to download the Chamelephon AppHERE.
Please, dial *#06# and copy out your authentic IMEI on a Piece of Paper. And after that, you can then follow the below guidelines.

Change IMEI On All Android 6.0 Marshmallow MTK Devices

#1: Firstly, you have to run and set up the downloaded Camelephon app in your device.
#2: Now launch the Chamelephon app and then click on on Authorize

#3: If you are using Dual sim, Note that: Primary field is for the IMEI of the sim 1 and the second field is for Sim 2.
#4: Also ensure you have already generated the IMEI you want to substitute it with. (This implies that, to change IMEI of sim one; you must change that of sim 2 as well, they work hand in hand)
#5: Now Paste your new IMEI”s within the areas offered and hit the “Apply new IMEI ” button.
#6: Then Verify the change
And lastly, reboot your device for the new IMEI to work then dial *#06# to view your new IMEI. Are you confused? if you are then use the below comment box to show your concern.

04 March 2017

How to Set Charging Limit On Your Android Device To Avoid Damaging Battery

Our smartphone are used everyday in our lifes and in other to keep it going, we have to charge it always to have enough power to use. Some people, in their to have enought power, they charge their phones to the fullest and this really damages the battery. Some other use power-banks everywhere there go i other to always be in power.All this really reduce the battery life span.
We often charge our phone and do overnight charging of our smartphone. We never think how much we are destroying our battery life. This is the reason why we get the less Screen on time, and people usually complain about the battery life of our smartphone, and they use third party applications such as Greenify to save the battery of our phone.


ABOUT BATTERY CHARGE LIMIT APK
This is the app which can be used to set the battery charge limit on any android phone. The XDA developer harsha1397 did know this issues and developed a fantastic application which will help the users to set the limited threshold. You can set your phone charging limit. This can be done in 2 ways, and that is if you have the phone you can dig into root settings and do changes or else you can do the settings with the help of his advanced application. I will be telling you both the ways in this article.
The developer kept two things in mind while developing this application and that is the users can run this application in most of the Android devices. If you are having the Android device 4.4 and above then you can run this application, and this works fine.

There are the basic requirements you must meet before this app till work perfectly for you

REQUIREMENTS
√ Rooted Android Phone.{See How To Root Any Android}
√ Android Device 4.4x above.
√ Your phone charger.
√ Battery Charge Limit App{Download Now 2.5MB}

ALSO SEE: How To Replace Kingroot With SuperSU

HOW TO SET CHARGING LIMIT ON YOUR ANDROID TO AVOID EXCESS CHARGE AND BATTERY DAMAGE

√ Download Battery charge limit from the link above and install it in yur phone
√ Now,open the app and Just click on Change and then set the default value to 85 or 75.


√ Now, just enable it to toggle on the option, and that’s it.

√ You can sit back without worry.


FINAL WORDS
This way you can set Charging Limit On Your Android Device. This is the easy and better way to set the limit and increase the battery life of your phone.
Share this article with your friends and do let them known about this application and its eye-catching features which will help you a lot.
This application worked for you? If yes then share us in the comment section. Thank you for visiting and keep visiting for more tips and tricks like this, and I will meet you in the next one.Remain blessed.

02 March 2017

How To Replace Kingroot With SuperUser In Android OS

Hello Friends, This is one of the best and very easiest method for Replace / Remove Kingroot/Kinguser app with Supersu / Superuser in Android mobile phones. If you have always looking rooted your Android Phone & Using Kingroot app, then you can simply using Kingroot or Kinguser app in your Android Smart Phone. In Some conditions, kingroot app is not performing Properly for gain toot access to some apps.


HOW TO REPLACE KINGROOT WITH SUPERSU.
This method will 100% Working in Almost all android phones, without PC. So you can easily remove Supersu & Install Kingroot instead in your phone with this Guide.Before we proceed , you will need the following requirements to continue:

REQUIREMENTS

  • Terminal Emulator{Download Now}
  • Win Rar for Android {Download Now}
  • The Android phobe rooted with king root
  • Working Internet Connection for Download Zip file.
  • Replace Kingroot with Supersu File{Download Now}
PROCEDURES TO REPLACE KINGROOT WITH SUPERSU

√ Firsly, Install Terminal Emulator
in your Android Phone, if you haven’t installed already.

√ After Installing that, Now Extract Zip file root of your SD card & in Internal Storage both, which you was downloaded above, named as Replace_Kinguser_with_Supersu-2.4.zip

√ Then, Now Open Terminal Emulator in your Phone, Type the command below and hit enter
su

√ After Enter above Command, It will ask you for Root permissions,
Grant Root permissions & Enter below command.
sh /sdcard/mrw/root.sh

√ Now, it will start running script & you have to wait for some time, approx 2-3 minutes maximum, make sure your mobile data is turned on.

√ After it’s Done, Now Open your App Drawer, & you will see there is the
super su app come. Just Simply you will open it.

√ Now, It will ask for you for Update Superuser binary, Click on Continue
button & Select Normal Mode.

√,It may ask for you that, other party root apps are already Installed, so you have to completely done and click on OK button & It will remove Kingroot ap from your mobile phone & Supersu app will come & Now you are completely done.

You Are Recommended To Watch The Video Guide Below


FINAL WORDS
So this is it people  just follow the guide above and you will successfully replace kingroot with SuperSU. Share the awsone trick and keep visiting us.Remain blessed.

25 February 2017

How To Enable Android 8.0 Oreo Boot Animation On Any Phone

The potential Android 8.0 rumors has even reached the ears of tech enthusiasts and as a tech geek ,we do fight out ways to utilize every opportunity we see.In our previous article, i posted about Android 8.0 Oreo Features. 

while we're still waiting for the Android 8.0 to be finally lunched,a developer at the XDA forum decided to take matters upon himself and thus he envisioned and built a "Concept" boot animation which he concludedly termed "Android 8.0 Oreo Boot animation". So in other to add more live and new look to your android device,am going to teach you how to enable android 8.0 oreo boot animation on any android device.


Requirements


  • Android 8.0 Oreo Boot Animation
  • 1080p : Download here.
  • 720p : Download here.
  • 1440p : Download here.

Installation Guide

To begin with, download the supported Android Oreo concept boot animation .Zip file from the link given above. Note choose the file that best correspond with your device screen resolution, in other for the boot animation to "Center" well on your android display. Next place the bootanimation.zip file on your SD card or internal memory without extracting it.

Now locate and open your favourite file manager, then grant it root access. (For Es File Explorer, swipe from left and enable root explorer). From here head over to the /system/media folder on your root partition. Then long-press on the existing bootanimation.zip file located there, select "Rename" from the context menu. Now add a ".bak" or any other preferred name to it as shown in below screenshot.

Next up, navigate back to your root-enabled file manager main menu, now locate the folder where you placed the downloaded bootanimation.zip. From here, long-press on the file then select "Copy." After that, head back to the /system/media folder, then paste the new file in this location. 

Now once you're through with the above procedure, we'll need to grant the .zip file permissions. To get this one going, long-press on the recently-copied bootanimation.zip file, then select "Permissions" from the context menu. Now make sure you set the permissions to "Read/Write/Execute" while all other permissions are set to just "Read". The below screenshot detailed everything.

Once you're through, simply reboot your Android phone and now you'll be greeted with the new Android 8.0 Oreo concept bootanimation. The concept looks nice and moreover it works perfectly on Moto G4 plus and any other android phone. If you encounter any issue while installing the Android 8.0 Oreo concept boot animation, then simply notify us by shooting your comments below.Remain blessed.

03 February 2017

How to Boost up Game Performance in Android Smartphone

Games are the things which we play everyday. Whenever we are free or not working. Sometimes while playing game we see a small glitches or we can say some games or not getting properly played in our device. This is the reason we are coming with an article in which I am going to tell you about how to boost up game performance in Android.
Nowadays there are many games available for Android and we play those game everyday and if we found any game which is high end there might be some glitches while playing that game.
Instead of that if you are having a rooted device. Then you can simply modify the game settings and you can play that games in your low end devices.

Everyday many games are launched and those games are played by thousands of peoples. Android is been one of the best platform if you are going to play any games.

I have seen many peoples in which PES 2017 is getting lag or else it has glitches. Which can be solved easily by using this software.


The name of the application is GLTools this is the paid application available on play store. You can download it from play store easily by paying USD 2. That is about NGN 800

This application is having the number of settings in which you can change it and after that you can do editing in the settings of the application. This application requires root access and there are some extra settings in the application.

It is having number of settings in which you can change the frame settings of the application. Then you can easily using the fake CPU/RAM info. In many application there are settings in which you can change the graphics of the application.

I will be providing the direct download link for you to download for free but you can still support the developer of the app by buying it from playstore.

Requirements:
Rooted Android Phone:See How To Root Your Android Mobile Easily Without PC
GLTools Android App:Click the download or Get it on playstore button.
 Image result for download now                    OR         Image result for get it on playstore


How To Boost Android Game Performance

  • Firstly, Make sure that you complete the above requirements and then you can proceed to next step.
  • Download the game in which you need to do settings of the graphical user interface.
  • Now, open the application and it will ask you to  grant the root permission. Simply click on Grant.
  • Then you need to click on Install Button. Now, your phone will automatically switched off and restarted. Don’t panic because its normal.
  • Now, after rebooting your device it will show you many application. Select the application in which you need to do changes just click on the application and then it is done.
                                           Boost up Game Performance in Android
  • Change the settings of the application and then you are done. Just open the application and that’s it. You will be able to run the application smoothly and in better way.
                                           Boost up Game Performance in Android
In Conclusion,
This way you can easily boost up game performance in Android. Now, say no to all the application which is having glitches while playing game.
I hope you like this article. Thank you for visiting and keep visiting for more tips and tricks like this and I will meet you in the next one.

Share this article with your friends. If any issues then feel free to comment below.Remain blessed.


22 January 2017

How To Use WiFi And Mobile Data Simultaneously On Android

Due to open source nature of Android, there are no limits to the possibilities of features developers can add in their apps. Or rather we can say developers can give more functionality to Android itself. Thus, users are always looking for ways to make the best of their Android smartphone. And yet, we have a great trick for you. If you are tired of waiting for your downloads to complete, we have a great solution for you. When you download a file, your phone has an option to choose between your mobile data and your WiFi connection. The default setting is go for any one of them. But most users don’t know that you can change this setting you can simultaneously use your mobile data and WiFi connection to download your files at double speed. Imagine 3G/4G speed added to your WiFi connection. Your phone will therefore use WiFi and mobile data  simultaneously to download files at a much faster speed as well as better connectivity. Then you don’t have to wait for a long time for downloads to finish. Maybe it is a heavy app or an HD video, you can have the benefit of speeds from WiFi and mobile data as well. This will be very helpful to most Android users and it is very easy to use. But due to some permission restrictions in Android, you need to root your phone.

Must See:How To Root Your Phone
 How To Use WiFi And Mobile Data Simultaneously On Android.

Step 1: First of all, Install Super Download:
This app is available on the Google Play store in 2 versions. The first one is a Paid App. There is also a LITE version but it has a limit of 50 MB. Links are given below. we suggest trying the LITE version first to see if this guide works for your phone and you can use WiFi and Mobile Data simultaneously.Am going to give the link to both the paid and free version.You can also support the developer if you think it is worth it by buying the paid version from playstore.
                             super download booster
                                               Super Download pro – Booster          
  Image result for download now                                       Image result for get it on playstore

                                             Super Download Lite – Booster

Image result for download now                                          Image result for get it on playstore

Step 2 : Provide SuperUser permissions.


Step 3 : Go to settings of the app and make sure Dual network has a check mark.

Step 4 : Copy a link from your browser for any file you want to download. Then use Super download to paste and download the file.

n conclusion, you can easily achieve highest download speeds by using WiFi and Mobile data simultaneously on Android. For any query, write to us  in comments below.Remain blessed.


30 December 2016

How to Get YouTube Red For Free on Android- 2017

YouTube Red is the best thing which is launched by Google. The other best thing is that you won’t see any ads on youtube and also you will be able to watch the youtube videos in the background and listen to the music and this is what the features of YouTube red. Today, I will tell you the way to get the amazing Youtube Red for free on Android.

There are peoples who are publishing the article about the way they got the feature of youtube red on their android device for free. You might have seen that none of these features are working.
Now, YouTube red is just available for the peoples who are staying in the United States. People of other countries like Nigeria,even their nearest country Canada they don’t get these features. Today, I won’t be saying the way you can get the full youtube red application on your phone.
I will be telling you the way you can enjoy those feature. If you really want to enjoy those features then you need to have a rooted Android device and Xposed installer installed on your phone which is important if you want to work with it.
There are many modules available which will help you out to do so and this is having amazing features but I found this module one of the best and the working one and today I will tell you the way you can run this module on your phone and how you can get these features of Youtube Red for free.
Image result for youtube red
If I say features, then this is something you should know the features and those are Youtube videos in the play ground and also no ads on youtube.
This features will only work only on your phone and you should be logged into your Gmail account and this is how it will work. If you will login using your computer on youtube then this won’t work.
This feature will work in all the Android phones which are having the Xposed installed and it will work fine if you are having the Xposed installed on your phone no matters if it is System-Less or Normal Xposed installed on your phone.

Requirements:

How to Use YouTube Red For Free on Android 2017

  • Download and install all the files are given in the above requirements and make sure that you have root access on your phone.
  • Open xposed installer and check Youtube Background PlayBack Module and reboot your phone.
  • Open any YouTube videos and play it then press home key and then you are enjoying the feature of Youtube red and if you will check out the notification settings you will check the option saying that you are enjoying the youtube red experience right on your phone.

Error:

If you are getting The log error:: Could not enable background playback for the YouTube app. Your installed version of it is not supported.Download the supported version HERE
Youtube Red for Free Android